
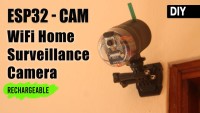
ESP32 WiFi CCTV Camera (ESP32-CAM) DIY Wireless Security Cam
Let's make a homemade wireless ESP32-CAM WiFi Surveillance Camera using an ESP32-CAM module.
This project is also available on Instructables.
Hello, fellow makers! I welcome you to my first Elektor Labs project about this Homemade wireless ESP32-CAM WiFi Surveillance Camera which we're going to make today to monitor our home, environment, or perhaps to even spy on someone ;)
Even though decent commercial WiFi Security Cameras aren't all super expensive, they still cost quite a bit especially when you're wanting to buy several of them for your home security. In this instructable, you will learn how to make your own DIY Surveillance camera for cheap, under $15 depending on the supplies you may already have. This project will be based on the $9 ESP32-CAM AI thinker WiFi camera module, in my opinion, one of the best and cheapest camera development boards out there.
With this security camera, you can log into the web server by typing in its unique IP address into your web browser, and view what the camera sees along with being able to change things around on the side control panels. The camera with its current code can save recorded .MJPEG video files to an SD card when something/someone moves in front of the camera triggering it to start recording. The Security camera comes loaded with even more features which will be mentioned below.
So without taking up any more of your time, let's prepare to make this CCTV cam!
Also, watch the project's YouTube video at the end of the article below.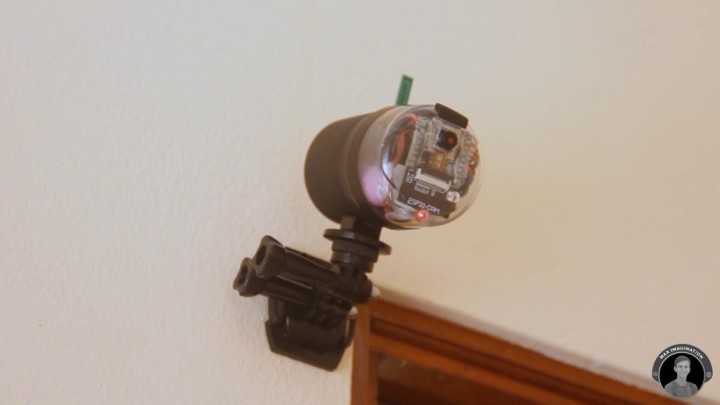
Needed Parts
Programming ESP32-CAM
First, let's upload the ESP32-CAM_MJPEG2SD code to the ESP32-CAM (credits to GitHub user "s60sc" for making their code available for anyone to download) please visit https://github.com/s60sc/ESP32-CAM_MJPEG2SD for more information and specs about the code, as well as the code itself.
To program the camera module, connect the camera module to a USB-to-serial converter "FTDI" like in the diagram seen above, with GPIO pin 0 connecting to GND allowing you to program the ESP. Don't forget to press the onboard reset button on the back of the camera module to set it into flash mode before uploading.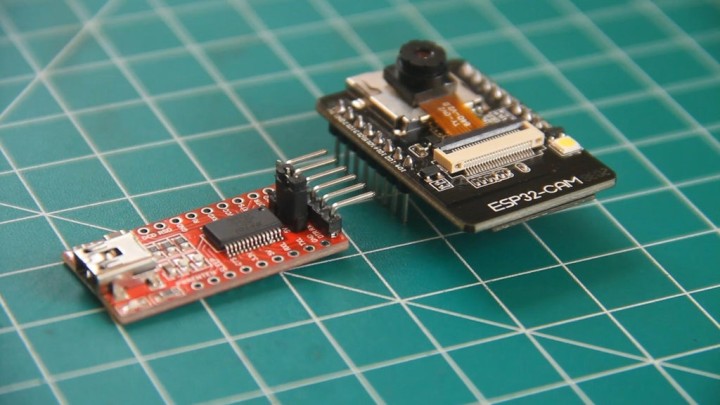
Before we move on to the actual code, check that you have the ESP32 .json link from this website linked below pasted in the preferences tab of the Arduino IDE. This link gives you access to example codes, all of the needed libraries, etc...
https://docs.espressif.com/projects/arduino-esp32/en/latest/installing.html
Make sure your ESP32 board library version is at 2.0.2 or higher.
Filling in Necessary Parameters In The Code
Open the Security Camera's code which you've downloaded (ESP32-CAM_MJPEG2SD) and fill in the necessary params such as selecting your camera model (uncomment "CAMERA_MODEL_AI_THINKER" if that's your board), enter your WiFi credentials, and lastly, FTP credentials (optional) if you're into getting hold of recorded footage remotely.
This now has to be done in the "utils.cpp" tab. Please don't get it confused for the "myConfig" tab, as that's what has been leading to many errors.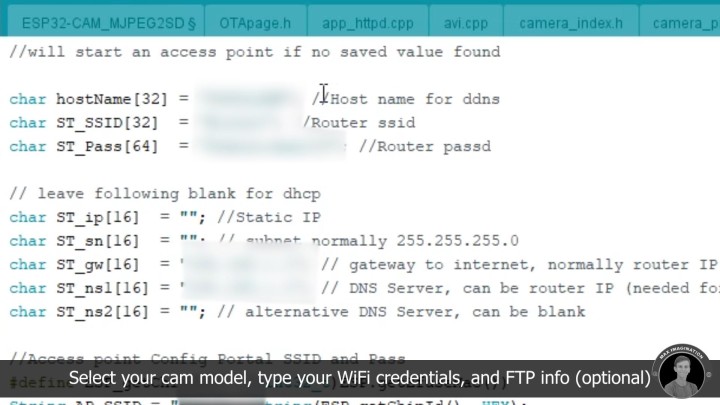
Uploading The Code
Make sure you select "ESP32 Dev Module" with partition scheme "Minimal SPIFFS (1.9MB APP with OTA/190KB SPIFFS)", enable PSRAM, and select your COM port. Then hit upload. Do know that uploading to the board may take a while, it's totally normal, please be a bit patient :)
Code: https://github.com/s60sc/ESP32-CAM_MJPEG2SD
ESP32-CAM's Web-server
Be sure to unplug the jumper wire going from IO0 to GND, press the reset button, insert a Micro SD card into the module's slot (Min. 4GB), then obtain its unique IP address from the Serial monitor (Serial button can be found at the top right-hand corner of the Arduino IDE).
After typing in the given IP address into your web browser with the camera still being powered, you should get a page looking like this, by pressing the "Start Stream" button, you will be able to view live what the camera sees.
(With the latest version of this code from the GitHub user "s60sc", you can now manually start and stop recording. Before, you were only able to trigger it to record when it sensed a movement.
Assembling the DIY Security Camera
Here are the parts you'll need in order to make the actual WiFi CCTV Cam. (Not totally accurate on the image to what was used)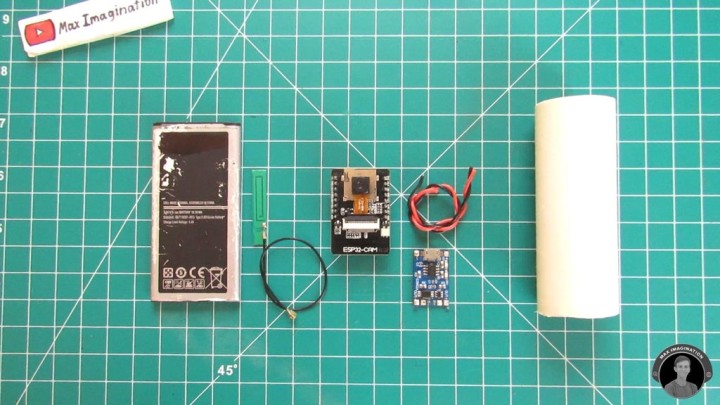
External Antenna and Power Supply
Desolder this 0-Ohm resistor that connects the ESP to its onboard antenna and resolder it to connect the ESP to the external antenna port.
This step must be done if you want a better range by being able to connect your own antenna. Hook up this TP4056 4.2V charging board to the battery, B+ & B- connections from the board to the battery go as shown (Connect the board's input terminals near the Micro USB port to the battery's terminals)
De-solder the ESP32-CAM's pin headers from both sides, instead, extend those pin headers by soldering them back on through wires. (Not to confuse you, try to use matching wire colors to their asserted purposes. You can also add an LED (3mm Red LED) as a power indicator, connect it across the input power terminals of the camera board with a 220-ohm resistor.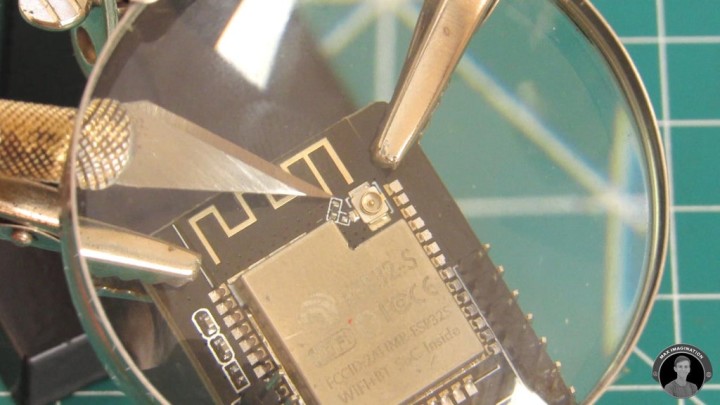
Circuit Diagram
Here's the DIY WiFi Security Camera's full circuit diagram.
Following this simple wiring diagram, you should have all of the hardware for your Homemade CCTV cam complete.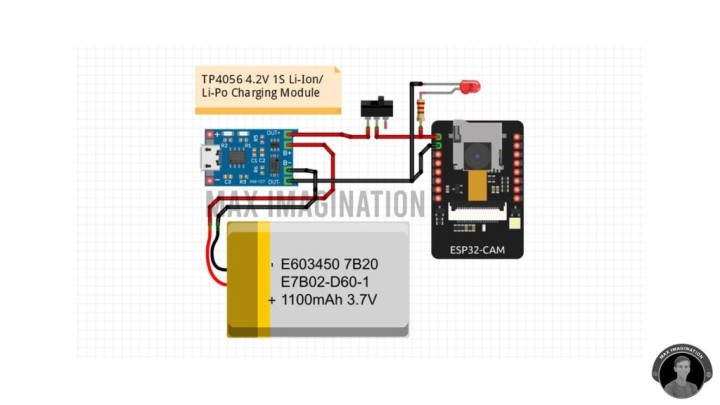
Choosing the Right Battery
As you saw, I started out with a flat Li-Ion battery since I thought the components would go into a differently shaped case. Then realized swapping out the battery was needed in order for it to fit into its new, proper cylindrical case.
Best to use a battery with a capacity or mAh rating higher than 2000 for better performance.
I ended up using x2 3.7V 2600mAh 18650 batteries in parallel, giving 5200mAh in total. A decent amount of power capacity.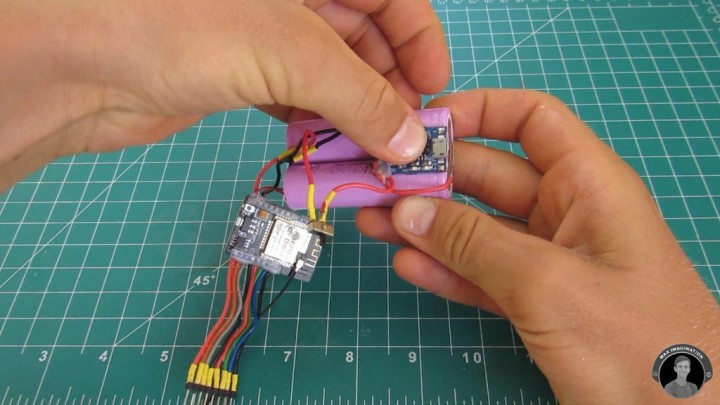
Fitting Things In The Case And Weather-proofing
Mark and drill out holes for certain parts of the hardware to poke out of the case.
When choosing a good case for your camera, use something with two parts to it, a case that's fairly easy to work with. 3D printing your own one is definitely an option going for if you've got a printer.
Next, add some adhesive/double-sided tape to parts such as the ends of the battery pack and ESP32-CAM module, then stick them into the case. Seal any component that sticks through with glue (preferably hot glue)
You may use hot glue to secure certain parts to the case if needed. Tape off the halves' joining section with electrical tape to prevent any water such as raindrops from seeping into the cam. Slice corresponding pieces of rubber, fit them into any gaps/holes such as the Micro USB port at the back and SD card slot at the top front.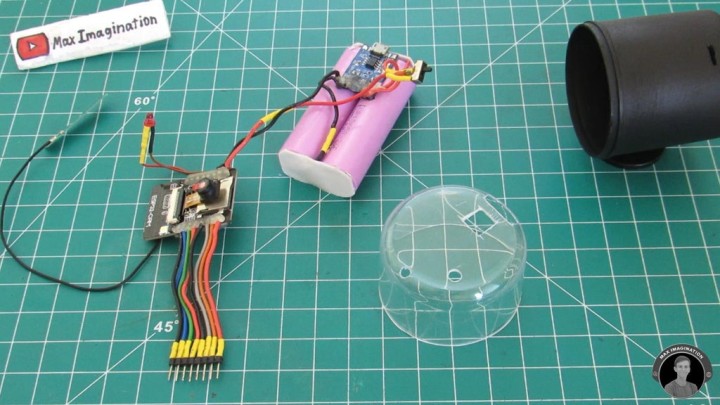
Testing the End Product
Slide in your Micro SD card into the cam's slot, push that little piece of rubber back in, power the camera up by sliding the switch on the rear, and find its unique IP camera web-server (Return to previous steps 5 & 6 for more clarity).
The camera's procedure to starting up and finding its web server goes as followed, though, this time you won't have to press any reset button as you're not reprogramming the camera.
On your viewing device, in the camera web-server menu, simply press the "Start Stream" button and you should get a live video feed from the CCTV camera. In this panel of the webserver, you should see a live video feed once you've pressed on "Start Stream".
Below you have additional info about whether it's recording or not, detecting low light (night time), space left on SD card, recording date, camera temperature, etc… You may even toggle the ESP's onboard LED lamp with the slide of a panel button, show AI-detected motion, alter sensitivity on certain functions, and more.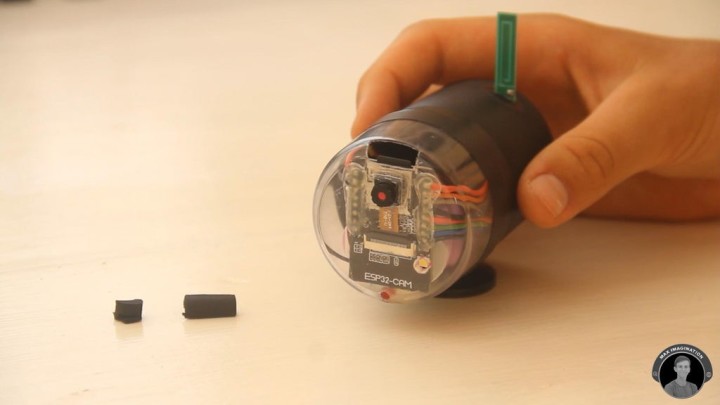
To change the camera's recording resolution (not only viewing res.) you can open the resolution tab, scroll through and choose a lower or even a higher one. (1600 × 1200 is the highest). Under the "Get Folder" tab, there you can preview the recorded video files and start playing the selected video file by pressing the same "Start Stream" button.
Powering the Camera Via USB
With the Homemade CCTV camera being attached to a wall, one would be better off having it continuously powered. So you may connect a 5V power supply to the Micro USB charging module connected via the cam's rear (Micro USB cable from wall socket phone charger). This is basically recharging the battery, but at the same time continuously powering the ESP32-CAM.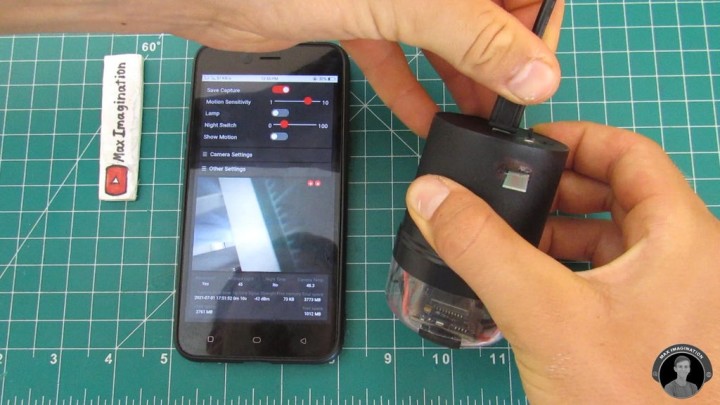
The battery won't last for too long if let's say you're going to record a spot overnight. Though running the camera on the battery can come in handy when you want to monitor an outdoor environment for a shorter period of time where a power outlet can't be reached.
Emptying Recorded Footage
Once you can see your MicroSD card is getting full, you can slide it out of the camera and slot it into your PC via an SD card adapter to then view the .MJPEG files via a player such as "VLC Media player".
There you have it, folks! Since you made it this far with your new cool little Homemade WiFi Security Camera, go out there with your new DIY CCTV cam and add an additional layer of security to your home! :)
Watch the full video tutorial below:
Hello, fellow makers! I welcome you to my first Elektor Labs project about this Homemade wireless ESP32-CAM WiFi Surveillance Camera which we're going to make today to monitor our home, environment, or perhaps to even spy on someone ;)
Even though decent commercial WiFi Security Cameras aren't all super expensive, they still cost quite a bit especially when you're wanting to buy several of them for your home security. In this instructable, you will learn how to make your own DIY Surveillance camera for cheap, under $15 depending on the supplies you may already have. This project will be based on the $9 ESP32-CAM AI thinker WiFi camera module, in my opinion, one of the best and cheapest camera development boards out there.
With this security camera, you can log into the web server by typing in its unique IP address into your web browser, and view what the camera sees along with being able to change things around on the side control panels. The camera with its current code can save recorded .MJPEG video files to an SD card when something/someone moves in front of the camera triggering it to start recording. The Security camera comes loaded with even more features which will be mentioned below.
So without taking up any more of your time, let's prepare to make this CCTV cam!
Also, watch the project's YouTube video at the end of the article below.
Needed Parts
- ESP32-CAM with OV2640 2MP camera sensor
- FTDI USB to Serial converter (for programming) + Female-to-female jumper wires
- 4GB MicroSD card (TF Card)
- Clip-on antenna
- TP4056 1-cell Li-Ion Charging module
- (x2) 18650 3.7V 2600mAh battery
- Mini SPDT sliding switch (3A toggle switch is recommended)
- Some 24-gauge electrical wire
- 3mm Red LED
- 220 Ohm resistor
- Cylindrical plastic container (choice of camera's enclosure is optional)
- GoPro mount accessories (if you want your camera to be attached to a wall)
Programming ESP32-CAM
First, let's upload the ESP32-CAM_MJPEG2SD code to the ESP32-CAM (credits to GitHub user "s60sc" for making their code available for anyone to download) please visit https://github.com/s60sc/ESP32-CAM_MJPEG2SD for more information and specs about the code, as well as the code itself.
To program the camera module, connect the camera module to a USB-to-serial converter "FTDI" like in the diagram seen above, with GPIO pin 0 connecting to GND allowing you to program the ESP. Don't forget to press the onboard reset button on the back of the camera module to set it into flash mode before uploading.
Before we move on to the actual code, check that you have the ESP32 .json link from this website linked below pasted in the preferences tab of the Arduino IDE. This link gives you access to example codes, all of the needed libraries, etc...
https://docs.espressif.com/projects/arduino-esp32/en/latest/installing.html
Make sure your ESP32 board library version is at 2.0.2 or higher.
Filling in Necessary Parameters In The Code
Open the Security Camera's code which you've downloaded (ESP32-CAM_MJPEG2SD) and fill in the necessary params such as selecting your camera model (uncomment "CAMERA_MODEL_AI_THINKER" if that's your board), enter your WiFi credentials, and lastly, FTP credentials (optional) if you're into getting hold of recorded footage remotely.
This now has to be done in the "utils.cpp" tab. Please don't get it confused for the "myConfig" tab, as that's what has been leading to many errors.
Uploading The Code
Make sure you select "ESP32 Dev Module" with partition scheme "Minimal SPIFFS (1.9MB APP with OTA/190KB SPIFFS)", enable PSRAM, and select your COM port. Then hit upload. Do know that uploading to the board may take a while, it's totally normal, please be a bit patient :)
Code: https://github.com/s60sc/ESP32-CAM_MJPEG2SD
ESP32-CAM's Web-server
Be sure to unplug the jumper wire going from IO0 to GND, press the reset button, insert a Micro SD card into the module's slot (Min. 4GB), then obtain its unique IP address from the Serial monitor (Serial button can be found at the top right-hand corner of the Arduino IDE).
After typing in the given IP address into your web browser with the camera still being powered, you should get a page looking like this, by pressing the "Start Stream" button, you will be able to view live what the camera sees.
(With the latest version of this code from the GitHub user "s60sc", you can now manually start and stop recording. Before, you were only able to trigger it to record when it sensed a movement.
Assembling the DIY Security Camera
Here are the parts you'll need in order to make the actual WiFi CCTV Cam. (Not totally accurate on the image to what was used)
- ESP32-CAM
- TP4056 1S battery charging board
- 18650 Li-Ion 3.7V battery
- SPDP Micro slide switch or 3A toggle switch
- 3mm Red LED
- 1/4W 220-ohm resistor
- Antenna
- 24-gauge electrical wire
- GoPro-compatible screw-mount
- For its case/enclosure, choose a container or material that will be easy for you to work with, as for myself, I've had lots of trouble getting the hardware fitted into that flattened PVC pipe shown above. (Later, you see me use a cylindrical plastic container)
External Antenna and Power Supply
Desolder this 0-Ohm resistor that connects the ESP to its onboard antenna and resolder it to connect the ESP to the external antenna port.
This step must be done if you want a better range by being able to connect your own antenna. Hook up this TP4056 4.2V charging board to the battery, B+ & B- connections from the board to the battery go as shown (Connect the board's input terminals near the Micro USB port to the battery's terminals)
De-solder the ESP32-CAM's pin headers from both sides, instead, extend those pin headers by soldering them back on through wires. (Not to confuse you, try to use matching wire colors to their asserted purposes. You can also add an LED (3mm Red LED) as a power indicator, connect it across the input power terminals of the camera board with a 220-ohm resistor.
Circuit Diagram
Here's the DIY WiFi Security Camera's full circuit diagram.
Following this simple wiring diagram, you should have all of the hardware for your Homemade CCTV cam complete.
Choosing the Right Battery
As you saw, I started out with a flat Li-Ion battery since I thought the components would go into a differently shaped case. Then realized swapping out the battery was needed in order for it to fit into its new, proper cylindrical case.
Best to use a battery with a capacity or mAh rating higher than 2000 for better performance.
I ended up using x2 3.7V 2600mAh 18650 batteries in parallel, giving 5200mAh in total. A decent amount of power capacity.
Fitting Things In The Case And Weather-proofing
Mark and drill out holes for certain parts of the hardware to poke out of the case.
When choosing a good case for your camera, use something with two parts to it, a case that's fairly easy to work with. 3D printing your own one is definitely an option going for if you've got a printer.
Next, add some adhesive/double-sided tape to parts such as the ends of the battery pack and ESP32-CAM module, then stick them into the case. Seal any component that sticks through with glue (preferably hot glue)
You may use hot glue to secure certain parts to the case if needed. Tape off the halves' joining section with electrical tape to prevent any water such as raindrops from seeping into the cam. Slice corresponding pieces of rubber, fit them into any gaps/holes such as the Micro USB port at the back and SD card slot at the top front.
Testing the End Product
Slide in your Micro SD card into the cam's slot, push that little piece of rubber back in, power the camera up by sliding the switch on the rear, and find its unique IP camera web-server (Return to previous steps 5 & 6 for more clarity).
The camera's procedure to starting up and finding its web server goes as followed, though, this time you won't have to press any reset button as you're not reprogramming the camera.
On your viewing device, in the camera web-server menu, simply press the "Start Stream" button and you should get a live video feed from the CCTV camera. In this panel of the webserver, you should see a live video feed once you've pressed on "Start Stream".
Below you have additional info about whether it's recording or not, detecting low light (night time), space left on SD card, recording date, camera temperature, etc… You may even toggle the ESP's onboard LED lamp with the slide of a panel button, show AI-detected motion, alter sensitivity on certain functions, and more.
To change the camera's recording resolution (not only viewing res.) you can open the resolution tab, scroll through and choose a lower or even a higher one. (1600 × 1200 is the highest). Under the "Get Folder" tab, there you can preview the recorded video files and start playing the selected video file by pressing the same "Start Stream" button.
Powering the Camera Via USB
With the Homemade CCTV camera being attached to a wall, one would be better off having it continuously powered. So you may connect a 5V power supply to the Micro USB charging module connected via the cam's rear (Micro USB cable from wall socket phone charger). This is basically recharging the battery, but at the same time continuously powering the ESP32-CAM.
The battery won't last for too long if let's say you're going to record a spot overnight. Though running the camera on the battery can come in handy when you want to monitor an outdoor environment for a shorter period of time where a power outlet can't be reached.
Emptying Recorded Footage
Once you can see your MicroSD card is getting full, you can slide it out of the camera and slot it into your PC via an SD card adapter to then view the .MJPEG files via a player such as "VLC Media player".
There you have it, folks! Since you made it this far with your new cool little Homemade WiFi Security Camera, go out there with your new DIY CCTV cam and add an additional layer of security to your home! :)
Watch the full video tutorial below:
Diskussion (0 Kommentare)