Red Pitaya - Blinking LED with Visual Programming
über

What is the purpose of such a towering feat of engineering? Quite a fundamental one actually. I have it in good faith from some actual engineers that a basic task like this is the perfect way to check whether or not your interface is working properly. Rome wasn’t built in a day, and if we can’t make a simple light switch on and off, how will we ever program a robot butler to bring us espresso in bed?
Step 1
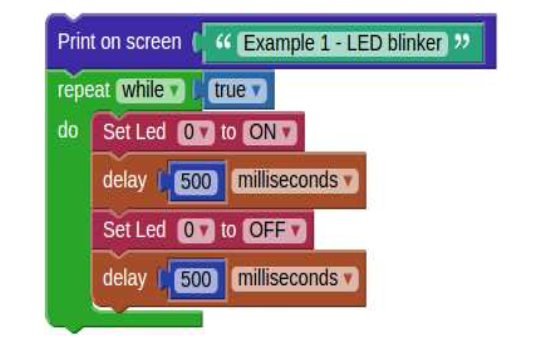
And so we begin. To light an LED we click Red Pitaya > Set LED block. The first entry in the block is used to choose one of the eight yellow LEDs. The second entry specifies if the LED should be turned ‘ON’ or ‘OFF’. In our example the first Set LED block turns the LED ‘ON’ while the second turns it ‘OFF’

Step 2
There are Program > Timing > delay blocks after Set LED. The first delay specifies for how long the LED will be shining, while the second delay specifies for how long the LED will be dark. The Set LED and delay blocks are wrapped into a Program > Loops > ‘repeat while’ block. This will repeat the LED ‘ON’, delay, LED ‘OFF’, delay sequence indefinitely, thus causing the LED to blink.

Step 3
You can set another LED to blink instead of LED ‘0’ , by changing the first entry in both Set LED blocks to a different number. If the two blocks are set to control different LEDs, then one LED will always shine, and the other will always be dark. You can change the rhythm of blinking by changing the values in the delay blocks . Try it and see what happens. You can also change everything else. In most cases, the program will not work. If this happens, just undo your changes, and try something else.


Diskussion (0 Kommentare)