
LED beamer
With this project I would like to find the possibilities to use a power LED as lightsource for a old lcd beamer.
With this project I would like to find the possibilities to use a power LED as lightsource for a old lcd beamer.
Many people have a lcd or dlp beamer for home or office use. Most of the lamps do not last any longer than 1000 hrs. If you use the beamer on a daily basis, lamp costs are quickly getting unacceptably high.
Because a replacement lamp often costs more than a new beamer, it might be interesting to find out if we can replace it by a high power LED.
This type of light source lasts about 50000 hrs (…) and costs a fraction of a Metal Hydride lamp.
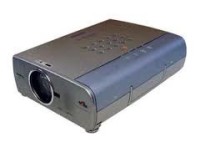
My projector is a SANYO PLC-SU20: resolution 800x600 pixels, 1000 ANSIlumen and a UHP lamp of 150W.
I like to replace it with a 100W high power LED with a LED driver board.
At Ebay I found exactly what I needed at a reasonable price: http://www.ebay.com/itm/Promotion-100W-White-High-Power-LED-Lamp-Driver-Lens-Reflector-/151073612141
Description for LED: (see led lamp.JPG)
LED Quantity: 1pcs
Lens Color: Water Clear
Emitted Color : White 100watt
DC Forward Voltage (VF): 30.0 ~ 36.0 Vdc
DC Forward Current (IF): 3000mA ~ 3300mA
Viewing Angle: 140 Degree
Intensity Luminous (Iv): 8000LM
Color Temperature: 6000~6500K
Size: 6*5.2CM
Description for Driver:
Driver Quantity: 1pcs (not waterproof)
Input Voltage: AC100V-260V
Output Voltage: 30V-36V
Output Current: 2800mA
Operating Temperature: -20-80°C
Storage Temperature: -20-80°C
Size: 14*5.5*2.7CM
The light comes with reflector and lens to focus the light to one point.
I found the service manual (see PLC-SU20B.pdf.zip) of the SANYO PLC-SU20 and made some modifications:
1. Physical mods (see images)
- I removed the standard UHP lamp and holder
- I removed the HV connector in the projector housing
- I removed the lamp ballast pcb and holder. The good news is that the LED driver board fits on the ballast holder!
- I inserted the LED driver pcb on the lamp ballast holder
- I screwed the LED on a heatsink (with cooling paste) and added also an extra fan. The reflector and lens are mounted on the LED.
This all was a bit “macgiver” style modding. the heatsink comes from an old SONY monitor, the fan fits exactly into the projector housing. I glued everything together with black TEC-7 silicone.
2. Electronic mods (see images)
SEE “powersupply now.jpg” and “powersupply LED.jpg”
First thing we need to do is make shure the beamer starts up when no UHP lamp is inserted. On almost all projectors with this type of lamp and ballast, this safety feature is achieved by triggering an opto coupler on the lamp ballast pcb.
Here on my beamer, output “lamp sens.” of the processing board must be connected to ground to make the projector believe that the lamp and ballast are connected.
When the projector starts up, the lamp is switched on by a second optocoupler: “lamp on/off” switches to 5V when turning the lamp on. I can use this signal to turn the LED on and off !
Now I made some more modifications to trigger the LED on and off when the power button is hit. Also I like to cool down the led the same way as the UHP lamp was cooled after turning off the projector.
I use the “lamp on/off” signal from the processor board to trigger a relay that switches on and off the LED driver board. Therefore, I simply use a BC547 transistor and a 1K8 resistor.
The power supply of the extra LED fan and the relay coil is simply paralleled to an existing fan supply voltage of 12V, which makes it easy to connect.
RESULTS: (see images projetor at work)
The beamer starts up and the LED switches on when I hit the on/off button. I immediately get light on the screen as the LED doesn’t need to “heat up”.
When I connect a test pattern, image looks nice and uniform, altough it is far from as bright as with the UHP lamp.
In dark conditions, the image looks great! Color temperature and uniformity are very acceptable!
When I hit the button again, the lamp switches off and the beamer runs its cooling sequence.
IMPROVEMENTS: (see coke can mod images)
At the lamp housing,a lot of light is reflecting on the condenser glass. I made a mod by adding a small aluminium cylinder (from an old coke can J )
This way there’s no more light “spilled”, all that comes out of the led goes into the light path.
I have also cleaned the optical path completely what made a big difference. Dust and moisture is a killer for beamers!
I did some tests by removing the optical condenser: brightness was much better but image quality dropped; no picture uniformity !! (so that's what the condenser does in the lightpath :-))
>> I placed the condenser back where it belongs.
CONCLUSION
I believe I made a good working LED beamer with a very acceptable light output and good image quality. Also it's not that difficult to build yourself!
Any idea's or suggestions are very welcome!
Frederik
Build This Project
Bring this design to life with the Elektor PCB Service, powered by Eurocircuits. Upload the project files and order professionally manufactured PCBs or assembled boards through a proven European production platform.
Supporting KiCad, Eagle, Gerber, and ODB++ formats, the service is suitable for everything from prototypes and validation builds to series production and volume manufacturing.
Made in Europe. Fast. Reliable. Professional.
Diskussion (1 Kommentar)