Face Recognition by YOLO on MaixCam board
Introduction: Face recognition is one of the most exciting applications of artificial intelligence (AI) in computer vision. With advancements in neural networks like YOLO (You Only Look Once), detecting and recognizing faces has become efficient, fast, and reliable. In this DIY guide, we will implement a 5-point face recognition system powered by YOLOv8—a lightweight yet powerful neural network framework designed for real-time object detection and recognition.
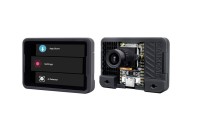
Hardware: For AI processing requires raw computing power. Running on Micro controller board may not be prudent always. Raspberry Pi 5 with 8 GB RAM is great. Even greater if you add a AI processor HAT on top of it [13 TOPS] because YOLO V8 requires lots of calculations for processing. But this Sipeed Chinese micro controller has the following specifications - Dual core: CPU Big Core: 1GHz RISC-V C906 / ARM A53, CPU Small core: 700 MHz RISC-V C906 / ARM A53, NPU: 1TOPS@INT8 [1 TOPS = 1 Trillion (10¹²) operations per second], 256MB DDR3 RAM, TFT touch screen, SDCard, Microphone for sound in, 5M Camera and WiFi is just moderate enough to run face recognition model and can save a modest 100+ faces in the database besides it’s priced at a very attractive rate - robu.in [INR:7K],
aliexpress.com [USD $50], alibaba.com, amazon.in [INR:12K]
Operating System: The MaixCam runs a lightweight, tailor-made Linux-based operating system designed specifically for Kendryte K210 boards. Key features include: Integrated support for YOLOv8, Headless mode for efficient remote operations, Python 3.11 for scripting and automation, SSH Daemon for secure remote access. This setup is ideal for real-time face recognition, making it a great choice for entry-level AI projects or lightweight edge AI systems.
Project overview: This project combines real-time face detection with a 5-point facial landmarking system for recognizing known and unknown faces. It uses GPIO pins to control external devices, such as a gate mechanism for employee access. LEDs are employed as visual indicators. The GPIO pin map for the MaixCam board will be used to control peripherals like LEDs or servo motors for the gate mechanism.
• Green LED: Lights up for recognized (known) faces.
• Red LED: Lights up for unrecognized (unknown) faces.
5-Point Face Recognition: The 5-point face recognition system focuses on identifying five critical landmarks on a face. These 5 points are - Two eyes, Nose tip & Two corners of the mouth. These landmarks are essential for alignment and recognition in most face detection algorithms. YOLOv8 is the latest version of the YOLO family. it’s faster, accurate & more efficient.
•Face detection: Locating faces in an image.
•Landmark detection: Pinpointing these five key facial points.
•Recognition: Matching the detected face with a stored database.
Operation with YOLO V8 offers.
•High accuracy: Precise detection even in low-light or cluttered environments.
•Efficiency: Runs in real-time on embedded systems.
•Versatility: Can detect objects, landmarks, and more in a single model.
Hardware Setup: This board Sipeed MaixCam is a compact AI-focused microcontroller originating from China. Detailed information about the board is available on the official Sipeed Wiki site [
https://wiki.sipeed.com/hardware/zh/maixcam/index.html ]. Although the website is primarily in Chinese, modern translation tools like Google Translator can help you navigate and understand its content effectively.
If you’re skeptical about Chinese-made boards, consider the example of the ESP32—also originally from China. Today, the ESP32 has arguably surpassed the popularity of the Arduino UNO in many applications due to its versatility and robust performance. Similarly, the MaixCam stands out for its quality and features, making it a reliable choice for AI applications.
To put things into perspective: running the same computing load on a Raspberry Pi 5 (8GB) requires additional components like a TFT display, keyboard, and a power supply capable of delivering at least 3A @ 5V, significantly increasing the overall cost. In contrast, the MaixCam is compact, runs on a standard mobile charger, and provides GPIO pins for additional operations—all in a highly cost-effective package. MaixCam has a Pro version which has NPU ~3 TOPs and capable of more demanding tasks.
The MaixCam series is designed for edge AI applications. Its compact size, efficient power usage, and integrated GPIO support makes it an excellent choice for projects like face recognition. Whether you choose the MaixCam or MaixCam Pro, both boards deliver impressive performance for AI workloads, proving that good things do come in small packages!
Operation: The best way to experience the board’s impressive capabilities is through a practical project. Consider a small MSME enterprise with fewer than 100 employees. This board can be effectively deployed at the entry and exit gates for attendance tracking and time management operations.
Step 1: Enroll Employee Faces
To get started, you need to save the faces of employees in the database:
1. Position the camera so it clearly captures the employee’s face.
2. Once the face appears sharp and focused on the screen, press the ‘Learn’ button located at the bottom left of the TFT screen.
3. The face is then saved in the system! [watch the /root/faces.bin size increases]
Step 2: Real-Time Operation
The rest of the process is straightforward:
1. Employees line up in front of the camera.
2. If the system recognizes the face from the database:
• The Green LED will light up, symbolizing “Gate Open.”
• The gate mechanism will activate to allow entry.
3. If the system does not recognize the face:
• The Red LED will light up, symbolizing “Gate Closed.”
Data Management
• The system maintains a person.txt file that maps the employee’s real name to their corresponding ID in the database.
• During real-time operation, the employee’s name and ID number are displayed on the screen.
Modifying or Deleting Entries
• If you need to delete or modify specific employee data, we’ve provided a Python script that can be executed on the MaixCam board in headless mode (via SSH or serial connection).
• For renaming entries, the person.txt file can be manually edited to assign the correct names to IDs.
Key Features can be summarised as
• Simple Learning Process: Enroll faces quickly by pressing the ‘Learn’ button.
• Efficient Gate Operation: Automated face recognition determines access.
• Visual Indicators: Dual LEDs (Red/Green) provide clear feedback for gate status.
• Editable Database: Easily manage employee records with the provided tools.
This project showcases how the MaixCam board can deliver cost-effective, real-time AI solutions tailored for small businesses. Its compact design, coupled with its intelligent functionality, makes it an ideal choice for automation tasks.
Connecting & setting Up the Maixcam: To get started, download the latest MaixCam operating system from the release page [
https://github.com/sipeed/MaixPy/releases]. However, in most cases, the board you purchased will already have an operating system installed. If so, you only need to connect the board to your computer. There are three main ways to connect the board to your computer: (1) USB direct connection, (2) Though SSH and (3) Using Maixvision IDE [
https://wiki.sipeed.com/maixvision ] for a more visual & integrated experiences.
For uploading the OS - Either you open the board back cover, remove the SDCard, upload the OS and then reinsert the SDCard back or do it without opening the back cover by pressing the user button and then inserting the USB cord into the computer. You may have to press the ‘user’ button few more times until the MaixCam appears as a USB drive labeled ‘boot’ in your “My Computer” page. Use “balenaEtcher” or any similar software to transfer the OS image to the MaixCam drive.
Once the OS is transferred, now remove the USB plug and the MaixCam will display the opening page on the TFT. Using your finger, press the ‘Settings”, find “WiFi” connections, Scan the network and connect it using the password. After connecting to WiFi, the MaixCam may prompt you to download the ‘MaixPy runtime’. Follow the on-screen instructions to complete this step and then play with the other icons on the TFT to understand the board better.
MaixVision IDE and SSH Setup: On the left side of the screen, you’ll find the MaixVision IDE. On the right side, you can access the MaixCam via SSH. From MaixVision, you can either use SSH or GFTP (Graphical FTP) to interact with the board. Alternatively, you can SSH directly from the command prompt of your computer using: ssh
root@192.168.82.112 [get the IP address from your router] when it asks for password it will be ‘root’. Many sample projects are available at
https://maixhub.com/app/ However, note that many of the projects are in Chinese, and the help files are often lacking.
Uploading: After doing the ssh into the board [ssh root@192.168.82.112, password “root”] you can scp to upload the file [scp inputfile.py root@192.168.82.112:/root/inputfile.py]. However, the best way to do this is to install MaixVision onto your computer and then do it inside the MaixVision. On the right side of MaixVision IDE, you will find “Device file manager”, select the drive where you want to upload and then simply press the button. One note of caution, never try to upload anything into the “/boot” directory of the device, it may spoil the operating system and end up transfering the image file again.
The system can learn and store new faces in real time. Each new face is assigned a unique ID and saved to the database. At the same time the “person.txt” file is populated with Id and Generic names. You can clear all saved faces and manually update the names with actual names.
The MaixVision IDE interface is similar to the MaixPy or OpenMV IDEs, making it familiar for users. To connect your MaixCam, use the bottom left “connect” icon in the MaixVision interface. This allows you to connect the board via a WiFi LAN connection. Once the MaixCam is connected to your WiFi network, you can access it through MaixVision from anywhere within your local area network (LAN).
Boot start: This is something different from other Sipeed boards where you just drop the code in the device as boot.py and it starts auto running. Here you have to do this way - Go to left side bottom of MaixVision IDE, Find the ‘Package’ button and make a package of your code. Provide all the data like - id, name, version, developer, description etc. Then submit and finally install it.
This will create a ink in the /maixapp/apps/
app.info file with your name and a folder named ‘facerecognition’ inside /maixapp/apps/ which will have 3 files one of them being main.py [which is nothing but your code.py ].
Now in the /maixapp/auto_start.txt file just enter your code - facerecognition & save the file. This file should not have any other entry. Disconnect your MaixCam board, your code will autostart.
Attachment: main.py, person.txt, yolov8n_face.mud, insghtface_webface_r50.mud. When you install the OS, the *.mud files will be there in the /root/models/ directory of the MaixCam board.
Bye, bye
S. Bera
Prototype: [see pic]

Diskussion (0 Kommentare)