
ESP32 TFT Multicam viewer
ESP32 TFT Multi cam viewer by press of a button will pick up one camera feed after another camera feed. It's cheap yet very stable and efficient.
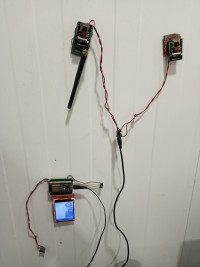
ESP32 Multiple Camera & single TFT viewer
Prelude: The cost of a ESP32 camera is barely USD $9 or about INR:700 only and with an improvised antenna one can deliver signal upto 200 meters distance. Therefore, setting up a few ESP32 cameras all around a house, porch , stair cases for watchman , garage or a fence is very cheap & easy. Whereas the cost of the TFT [3.5”] viewer along with ESP32 comes around INR:1800 or USD $17. However, keeping eyes fixed on several TFT screens is a bit troubling. Therefore, here we are proposing a single TFT viewer to see several camera feeds.
For each camera there will be a fixed button connected to one GPIO. By pressing that button the feed will be transferred to that camera. That way one can hop from one feed to the other feed effortlessly.
Source Cameras: The multiple pick up cameras are setup at several places of a strategic place like – lift landings of multistory building, Garage area, open campus etc. Each camera is a stand alone ESP32 camera operating on WiFi Access Point mode. Each camera can have it’s own independent SSID, Password, IP address, subnet and access port. However for simplicity we have kept everything same except the SSID [bera1,bera2,bera3 etc.] parameters.
Since we will be connecting only one camera at a time, the problem of IP address collision is not a problem to be considered now. However, later if you consider to have multiple recipients to have the live feed of cameras, then you may like to have separate IP addresses for these source cameras.
WiFi Camera on AP mode: The WiFi camera in “Access Point” mode is set up as an independent hot spot itself. One can connect the camera and get the cam view on the fixed IP address or the DHCP IP address mode. For that the set ups have been explained in the predecessor project. However, few recalls always come handy for this project.
Remove the password parameter, if you want the AP (Access Point) to be openssid_hidden: (0 = broadcast SSID, 1 = hide SSID)channel: Wi-Fi channel number (1-13)max_connection: maximum simultaneous connected clients (1-4)softAP(const char* ssid, const char* password, int channel, int ssid_hidden, int max_connection) WiFi.softAP(ssid, password, 1, 10, 2); //Set a fixed IP address by this Serial.println("Set softAPConfig"); IPAddress Ip(192, 168, 10, 10); // Select your IP address now. IPAddress NMask(255, 255, 255, 0); //Select the netmask now. WiFi.softAPConfig(Ip, Ip, NMask); ESP32 Multi Cam view on ESP32 TFT: In websocket camera, instead of refreshing the entire webpage, we only get the portion of the page where it gets updated / changed. That way it creates substantially less load on our tiny device – ESP32 TFT Viewer. The ESP32 connects the source camera in the Setup() section. To make the viewer capable of connecting to multiple source cameras, we have used the built in EEPROM capability of ESP32 besides it’s SPIFES read-write capability. Each time we press the camera selection button, it writes the specified camera number into the EEPROM and then it gives a reset command to the ESP32. ESP32 boots up, reads the camera number from the EEPROM and then selects which source camera to connect, and the feed becomes available on the TFT screen. For simplicity excepting the SSID parameter all other WiFi parameters of the source cameras are kept same. This makes the code simple and easily understandable. Once you understand this simple structure, you can always create separate & complex identities for the source cameras.
SSID: bera1,bera2,bera3, …PWD:abcdefgh, abcdefgh, abcdefgh,….IP:192.168.10.10, 192.168.10.10, 192.168.10.10Subnet: 255.255.255.0, 255.255.255.0, 255.255.255.0Port: 80,80,80,80Schematic of ESP32 source webcam:
Schematic of ESP32 Multi Cam Viewer:
ILI9341 TFT preferably 2.8” to 3.5” display works best. On websocket the update is pretty fast when we select smaller pixel mode [CIF mode : 400x296] of transmission [config.frame_size = FRAMESIZE_CIF;] The best refresh rate on CIF frame size is 160 milli seconds and is good for reasonable Video feed.
BOM: [With Sources]
ESP32 x 3 no Cam: *INR 700 https://robu.in/product/esp32-cam-wifi-module-bluetooth-with-ov2640-camera-module-2mp/
ESP32 x 1 nos [38 pin] : *INR 550 https://calcuttaelectronics.com/product/esp32-development-board-wifibluetooth-30-pin/
3.3 volt regulator x 4 nos: AMS1117 or HT7333 =* INR 20 https://calcuttaelectronics.com/product/ams1117-5-0/
TFT 2.8” to 3.5” ILI9341 x 1no: *INR 1200 https://robu.in/product/2-8-inch-spi-screen-module-tft-interface-240-x-320-without-touch/
Total Expenditure [without power supply] for 3 source cam & one viewer TFT is = *INR:4000 [$54]
* INR 75 = USD $1
Working principle of ESP32 webcam with TFT / OLED: For image handling by ESP32 there are many Arduino libraries but for this project we find the TFT_eSPI.h is the fastest one and easy to manage. You can very easily change the TFT type by simply changing the TFT specific file in the User_Setup_Select file. To use the smaller display like ILI9163 type you have just to uncomment the respective line. It’s very easy and you also can define which pin you would like to connect to the TFTs. TFT_eSPI also have facility to connect ILI9488 parallel type 3.5” TFT display as well! The parallel TFT will be little faster than the Serial display. Three pin regulator HT7333 has low drop out loss therefore, for Solar type set up I recommend it over AMS1117.
#include // Setup file configured for my ILI9341 //#include // Setup file configured for ST7735 //#include // Setup file configured for my ILI9163 Software for ESP32 websocket cam & ESP32 TFT viewer : is attached. Most of the libraries I have attached. However, if you find some libraries are missing, just get them installed from Arduino IDE vide Sketch –> Include library –> manage libraries ESP32 Camera Programmer: The ESP32 camera does not come with built in USB to serial interface. Therefore, to upload the sketch one needs to have a USB to Serial programmer which looks like this and comes for INR:250 to INR:300. The schematics shown below. The GPIO 0 to be pulled to ground during uploading mode and the reset button of the ESP32 to be pressed during first few seconds of uploading after that it is to be released.
HT7333 pinout:
Set up: In the present set up everything is set for an ILI9341 3.5” SPI TFT display to work. For changing to a smaller display like ILI9163 one has to comment out the ILI9341 line and uncomment the ILI9163 line in User_Setup_Select file. The connections are to be made as per the schematics shown.
The camera has the following Image quality setups – VGA 640x480
SVGA 800x600
XGA 1024x768
SXGA 1280X1024
UXGA 1600X1200
CIF 400X296
QVGA 320X240
HQVGA 240X176
QQVGA 160X120
The key word [the English letter word] is to be used inside setup in the if loop -
if(psramFound()){
config.frame_size = FRAMESIZE_CIF;
config.jpeg_quality = 10;
config.fb_count = 2;
} else {
config.frame_size = FRAMESIZE_SVGA;
config.jpeg_quality = 12;
config.fb_count = 1;
}
For bigger and better quality picture use higher resolution image quality like SXGA or UXGA type while for smaller size TFT use VGA or CIF type. The bigger the picture size is the slower the feed becomes.
Aftermath: ESP32 camera is very cheap so is the TFT display. With a small external antenna the distance between the camera and viewer can be increased as high as 200 meters in open area. Since these cameras depend on 3.3 volt only, an 18650 Lipo cell along with a small 5 to 10 watt solar panel is enough to power them 24x7 under open sunny area.The possible uses can be –(1) Watchman surveillance camera for a multistory building.(2) Monitoring of a big parking area. (3) Open farmland surveillance camera running on a small 10 Watt solar panel. Bye bye,Bera / Vindhyanagar
Prelude: The cost of a ESP32 camera is barely USD $9 or about INR:700 only and with an improvised antenna one can deliver signal upto 200 meters distance. Therefore, setting up a few ESP32 cameras all around a house, porch , stair cases for watchman , garage or a fence is very cheap & easy. Whereas the cost of the TFT [3.5”] viewer along with ESP32 comes around INR:1800 or USD $17. However, keeping eyes fixed on several TFT screens is a bit troubling. Therefore, here we are proposing a single TFT viewer to see several camera feeds.
For each camera there will be a fixed button connected to one GPIO. By pressing that button the feed will be transferred to that camera. That way one can hop from one feed to the other feed effortlessly.
Source Cameras: The multiple pick up cameras are setup at several places of a strategic place like – lift landings of multistory building, Garage area, open campus etc. Each camera is a stand alone ESP32 camera operating on WiFi Access Point mode. Each camera can have it’s own independent SSID, Password, IP address, subnet and access port. However for simplicity we have kept everything same except the SSID [bera1,bera2,bera3 etc.] parameters.
Since we will be connecting only one camera at a time, the problem of IP address collision is not a problem to be considered now. However, later if you consider to have multiple recipients to have the live feed of cameras, then you may like to have separate IP addresses for these source cameras.
WiFi Camera on AP mode: The WiFi camera in “Access Point” mode is set up as an independent hot spot itself. One can connect the camera and get the cam view on the fixed IP address or the DHCP IP address mode. For that the set ups have been explained in the predecessor project. However, few recalls always come handy for this project.
Remove the password parameter, if you want the AP (Access Point) to be openssid_hidden: (0 = broadcast SSID, 1 = hide SSID)channel: Wi-Fi channel number (1-13)max_connection: maximum simultaneous connected clients (1-4)softAP(const char* ssid, const char* password, int channel, int ssid_hidden, int max_connection) WiFi.softAP(ssid, password, 1, 10, 2); //Set a fixed IP address by this Serial.println("Set softAPConfig"); IPAddress Ip(192, 168, 10, 10); // Select your IP address now. IPAddress NMask(255, 255, 255, 0); //Select the netmask now. WiFi.softAPConfig(Ip, Ip, NMask); ESP32 Multi Cam view on ESP32 TFT: In websocket camera, instead of refreshing the entire webpage, we only get the portion of the page where it gets updated / changed. That way it creates substantially less load on our tiny device – ESP32 TFT Viewer. The ESP32 connects the source camera in the Setup() section. To make the viewer capable of connecting to multiple source cameras, we have used the built in EEPROM capability of ESP32 besides it’s SPIFES read-write capability. Each time we press the camera selection button, it writes the specified camera number into the EEPROM and then it gives a reset command to the ESP32. ESP32 boots up, reads the camera number from the EEPROM and then selects which source camera to connect, and the feed becomes available on the TFT screen. For simplicity excepting the SSID parameter all other WiFi parameters of the source cameras are kept same. This makes the code simple and easily understandable. Once you understand this simple structure, you can always create separate & complex identities for the source cameras.
SSID: bera1,bera2,bera3, …PWD:abcdefgh, abcdefgh, abcdefgh,….IP:192.168.10.10, 192.168.10.10, 192.168.10.10Subnet: 255.255.255.0, 255.255.255.0, 255.255.255.0Port: 80,80,80,80Schematic of ESP32 source webcam:
Schematic of ESP32 Multi Cam Viewer:
ILI9341 TFT preferably 2.8” to 3.5” display works best. On websocket the update is pretty fast when we select smaller pixel mode [CIF mode : 400x296] of transmission [config.frame_size = FRAMESIZE_CIF;] The best refresh rate on CIF frame size is 160 milli seconds and is good for reasonable Video feed.
BOM: [With Sources]
ESP32 x 3 no Cam: *INR 700 https://robu.in/product/esp32-cam-wifi-module-bluetooth-with-ov2640-camera-module-2mp/
ESP32 x 1 nos [38 pin] : *INR 550 https://calcuttaelectronics.com/product/esp32-development-board-wifibluetooth-30-pin/
3.3 volt regulator x 4 nos: AMS1117 or HT7333 =* INR 20 https://calcuttaelectronics.com/product/ams1117-5-0/
TFT 2.8” to 3.5” ILI9341 x 1no: *INR 1200 https://robu.in/product/2-8-inch-spi-screen-module-tft-interface-240-x-320-without-touch/
Total Expenditure [without power supply] for 3 source cam & one viewer TFT is = *INR:4000 [$54]
* INR 75 = USD $1
Working principle of ESP32 webcam with TFT / OLED: For image handling by ESP32 there are many Arduino libraries but for this project we find the TFT_eSPI.h is the fastest one and easy to manage. You can very easily change the TFT type by simply changing the TFT specific file in the User_Setup_Select file. To use the smaller display like ILI9163 type you have just to uncomment the respective line. It’s very easy and you also can define which pin you would like to connect to the TFTs. TFT_eSPI also have facility to connect ILI9488 parallel type 3.5” TFT display as well! The parallel TFT will be little faster than the Serial display. Three pin regulator HT7333 has low drop out loss therefore, for Solar type set up I recommend it over AMS1117.
#include
HT7333 pinout:
Set up: In the present set up everything is set for an ILI9341 3.5” SPI TFT display to work. For changing to a smaller display like ILI9163 one has to comment out the ILI9341 line and uncomment the ILI9163 line in User_Setup_Select file. The connections are to be made as per the schematics shown.
The camera has the following Image quality setups – VGA 640x480
SVGA 800x600
XGA 1024x768
SXGA 1280X1024
UXGA 1600X1200
CIF 400X296
QVGA 320X240
HQVGA 240X176
QQVGA 160X120
The key word [the English letter word] is to be used inside setup in the if loop -
if(psramFound()){
config.frame_size = FRAMESIZE_CIF;
config.jpeg_quality = 10;
config.fb_count = 2;
} else {
config.frame_size = FRAMESIZE_SVGA;
config.jpeg_quality = 12;
config.fb_count = 1;
}
For bigger and better quality picture use higher resolution image quality like SXGA or UXGA type while for smaller size TFT use VGA or CIF type. The bigger the picture size is the slower the feed becomes.
Aftermath: ESP32 camera is very cheap so is the TFT display. With a small external antenna the distance between the camera and viewer can be increased as high as 200 meters in open area. Since these cameras depend on 3.3 volt only, an 18650 Lipo cell along with a small 5 to 10 watt solar panel is enough to power them 24x7 under open sunny area.The possible uses can be –(1) Watchman surveillance camera for a multistory building.(2) Monitoring of a big parking area. (3) Open farmland surveillance camera running on a small 10 Watt solar panel. Bye bye,Bera / Vindhyanagar
Diskussion (3 Kommentare)