
ESP32 Doorbell via Telegram
Forward your doorbell to your smartphone or computer.
It happens to all of us: you are at home, but for whatever reason you don't hear the doorbell, even though there really is a visitor at the door. If it's family or a close acquaintance, chances are they'll grab their mobile phone and try to find out if you're home, but not everyone has your phone number at hand. It's only really annoying when you've stayed home especially because an order is being delivered that you're desperately waiting for and the deliveryman leaves unfulfilled. Deliverers usually don't have the patience or the time to call again and later in the day you'll find a note in your mailbox that you can pick up the parcel somewhere or that it will be offered again on another day.
With the project we are presenting here, the chance of missing the doorbell is much smaller: as soon as the doorbell rings, this circuit sends a message to your smartphone or computer on which the Telegram app is running, so that almost everywhere (even when you are not at home!) you can be alerted to the presence of a visitor at your doorstep. If you are absolutely sure who it is and trust this person 100%, you can even send back a message that operates an electric door opener, so that you don't even have to bother to walk to the front door yourself.
Telegram is an instant messaging service that can best be compared to Whatsapp in terms of functionality. Both services are linked to your mobile phone number, and Telegram also offers the possibility to register your user name, so that your account can also move with you when you get a different mobile number. There are even more (more or less) subtle differences and if you want to know more about it, you can find more than enough comparisons between the two applications on the internet.
In this article we will see that with Telegram it is very easy to work with bots and - in this case - to communicate and control with an ESP32 remotely, in this case to send a message when a key is pressed and to translate a (possible) answer into the activation of a relay. Of course, the possibilities are not limited to this relatively simple application, the concept can easily be adapted and expanded.
The ESP32 (and its predecessor, the ESP8266) has already been used and extensively discussed in many Elektor projects. Here we are going to use this -very simplistically said- as a smart module that interacts with the outside world via WiFi. Together with the well-known Arduino development environment and the UniversalTelegram bot library, developing applications like this is a piece of cake. But....
However simple the application may be, during the development of this project we had to deal with a very special phenomenon, as a result of which it ultimately took a lot more time than expected and planned. Imagine: the source code compiles without error messages, upload to the ESP32 is also fine and the circuit initially seems to work as expected. To be more precise: something is happening, but further research shows that the microcontroller always resets when a message arrives via Telegram.
All checked and tried, no mistake to discover. So let's recompile and test on another computer and to your amazement the ESP will do what is expected of it! Check again if both computers have the same versions of the Arduino IDE and libraries, no difference to be found. Finally, on the first computer, we completely removed Arduino (no ordinary uninstall, which apparently leaves remnants in -hidden- folders anyway), installed it freshly and all problems are gone. What the problem was... we still have no idea and we won't find out anymore. I learned that the Arduino IDE can be very unpredictable, even if it was the first time we encountered such a thing. And let's agree: also the only and last time!
With minor modifications to the software, this project can be used with any ESP32 or -8266 module, but for this project we have chosen the M5Stack ESP32 Basic Core module which is available in the Elektor shop. It is a nice compact module in a neat housing with a graphical display, push buttons, a speaker and a built-in rechargeable battery. I/O's are accessible via connectors on the outside, but if you open the back of the box and remove a plug-in board, you'll find a 30-pole expansion connector to which you can connect your self-designed hardware.
For small expansions like this one, the extra hardware fits on a PCB of the same size as the M5Stack module itself. With an extra part for the housing, for which designs for 3D printing can be found on the internet, you have a neatly finished device without a lot of extra work, so that an experimental prototype is quickly translated into a box that also looks good in the living room. In short: this M5Stack is very suitable as a basis for ESP32 designs, both as a development platform for a project as a 'ready-made' device. In principle, you can also use the M5Stack and our expansion board to build a complete doorbell installation.
The built-in loudspeaker can compete with a 'real' doorbell in terms of volume and a separate doorbell button can be placed parallel to (or instead of) the output transistor of the optocoupler. In the Arduino-sketch the ringing signal has to be added, and the logical level at GPIO17 is -if the button is connected like this- inverted. However, this will not be discussed here, we will limit ourselves to a doorbell extension that is connected to an existing installation. Hardware Figure 1 shows the schematic diagram for the doorbell, it couldn't be simpler.
We assume that the M5Stack is externally powered via USB, the additional hardware therefore only provides the control of a door opener via T1 and RE1 and connection to the doorbell button via optocoupler IC1. Our doorbell extension can therefore be connected directly to an existing doorbell system, so the two wires of the doorbell button are connected to K1 of our circuit. Traditionally, an electric doorbell is supplied with an AC voltage, but the bell voltage has never been a standard. Depending on the installation, this can be a voltage between 6V and 24V and there will probably also be exotics that are outside this range. We have this alternating voltage on the wires of the button as long as it is not pressed and, in this case, also on K1. The optocoupler translates the presence of this voltage into a logical level at GPIO17 of the ESP32: the level at rest (when not ringing) is low and high when the button is pressed.
Then there is the BT1 connection which, as the indication suggests, is intended to optionally (re)connect the 3.7V lithium battery that is fitted as standard in the M5Stack. Note the polarity, the red wire at the plus and black at the minus of BT1.
The expansion board contains only through-hole components and will therefore not be so difficult to assemble. We do pay special attention to the mounting of K2, because this is mounted differently than we are used to with such a standard part (see picture). Normally the short sides of the pins are inserted into the PCB from the component side and soldered, but in this case we do it the other way around: the long pins are inserted from the copper side ('bottom' of the PCB) upwards and soldered on the component side. The short pins are inserted into the socket of the M5Stack and the plastic of K2 also serves as a spacer between the two circuit boards.
Log in to Telegram app on the computer with the mobile phone number, in the app on the phone a verification code will appear that needs to be typed back into the computer, after which Telegram will be active there. The sketch on the ESP32 will work with a so-called 'bot', which is easy to imagine as a kind of automatic answering machine. It can respond to commands received via a Telegram chat message (as in this project: controlling a door opener), or send messages via Telegram that are triggered by events in or near the ESP, such as reporting a key press or sending an ADC value. This bot must first be created in Telegram and this is done by searching for 'BotFather' in the contacts list. BotFather itself is a bot, that helps to create our doorbell bot in a chat dialogue.
After entering the command '/newbot' the dialog starts, asking for a name (which will later be displayed in the contact list in Telegram) and for username of the bot, the latter should always end with the characters 'bot'. Note the slash ('/') at the beginning of each bot command. When this process is successful, the BotFather will notify you and display a code ('token') needed to authorize the new bot to send requests to the Bot API. Keep this token in a safe place, as it can be used by anyone to control the doorbell bot, which is why we have made the token of our bot in Figure XX (using_BotFather.jpg) unreadable. In this dialog with BotFather, click on the framed link ('t.me/...') to open a chat window for the new bot, which will also be added to the contact list. This bot is now ready for use, although it still needs to be linked to the Arduino-sketch for our doorbell extender.
Arduino sketch for this project In the software download of this project you can find the sketch DOORBELL.INO, the source code for the ESP32 firmware. This sketch can be improved and in its current form is mainly intended to show how Arduino/ESP32 and Telegram can work together to make control systems very simple. Especially the operation of an electric door opener is a vulnerability, people could hack into the bot and open the door with their phone or computer. Elektor accepts no liability whatsoever for any damage that may result from the application of this project! In the sketch, our M5Stack must be registered on the local wireless WiFi network and given access to the Telegram-bot that we have just created.
The credentials of your WiFi network are entered in lines 17 and 18, the token that the BotFather has reported must be entered in line 21. Hence the earlier advice to create the bot on the computer, so that the token can easily be copied into the sketch, it is not exactly a set of characters that you can easily remember and retype. Once the installation of the Arduino IDE as mentioned above has been followed and successfully completed, the sketch will compile without any problems. In the Tools menu -when the M5Stack is connected to a USB port of the computer- the correct board ('M5Stack-Core-ESP32') and the virtual COM port must be set to upload the sketch to the ESP32. After that is done, the sketch will start up, connect to the network and the name of the WiFi network and the IP address of the doorbell extender will appear on the LCD of the M5Stack.
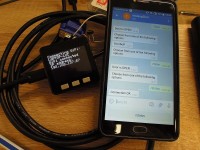
The bot must be activated after each restart of the sketch by sending the command '/start' via the chat window in Telegram, the bot must then give a feedback including an overview of the commands it supports. The operation is also very simple. When the doorbell rings, a message is sent via the Telegram app to your computer or smartphone. The user can respond by opening the door himself or by using the '/Open' button to operate an electric door opener (if there is one), the '/Ignore' button waives this option, and the '/Status' button (which checks the connection to the doorbell extender) appears again at the bottom of the chat screen. These commands can also be simply typed in and sent via the chat window, please note that they are case-sensitive!
The UniversalTelegram bot library actually does most of the work in this project. This library and its documentation can be found at https://Github.com/witnessmenow/Universal-Arduino-Telegram-Bot, and with the examples that come with it, it doesn't take a lot of effort to get started. Our doorbell-sketch is based on the 'custom keyboard' example, which shows how to send control buttons to the Telegram app, which is a very handy option, so you don't have to type control commands yourself in the chat window.
The most important subroutine is 'handleNewMessages' which processes incoming messages. In four If-statements the commands/messages our bot understands are handled: start, status, Ignore and Open. For sending messages the sketch needs the ID of the chat, which is saved in variable 'ThisChat' after receiving the first command '/start'. The push-button (doorbell) is captured in an interrupt, note the IRAM_ATTR attribute that is required for the declaration of an ESP interrupt service routine for correct handling.
With the project we are presenting here, the chance of missing the doorbell is much smaller: as soon as the doorbell rings, this circuit sends a message to your smartphone or computer on which the Telegram app is running, so that almost everywhere (even when you are not at home!) you can be alerted to the presence of a visitor at your doorstep. If you are absolutely sure who it is and trust this person 100%, you can even send back a message that operates an electric door opener, so that you don't even have to bother to walk to the front door yourself.
Telegram is an instant messaging service that can best be compared to Whatsapp in terms of functionality. Both services are linked to your mobile phone number, and Telegram also offers the possibility to register your user name, so that your account can also move with you when you get a different mobile number. There are even more (more or less) subtle differences and if you want to know more about it, you can find more than enough comparisons between the two applications on the internet.
In this article we will see that with Telegram it is very easy to work with bots and - in this case - to communicate and control with an ESP32 remotely, in this case to send a message when a key is pressed and to translate a (possible) answer into the activation of a relay. Of course, the possibilities are not limited to this relatively simple application, the concept can easily be adapted and expanded.
The ESP32 (and its predecessor, the ESP8266) has already been used and extensively discussed in many Elektor projects. Here we are going to use this -very simplistically said- as a smart module that interacts with the outside world via WiFi. Together with the well-known Arduino development environment and the UniversalTelegram bot library, developing applications like this is a piece of cake. But....
However simple the application may be, during the development of this project we had to deal with a very special phenomenon, as a result of which it ultimately took a lot more time than expected and planned. Imagine: the source code compiles without error messages, upload to the ESP32 is also fine and the circuit initially seems to work as expected. To be more precise: something is happening, but further research shows that the microcontroller always resets when a message arrives via Telegram.
All checked and tried, no mistake to discover. So let's recompile and test on another computer and to your amazement the ESP will do what is expected of it! Check again if both computers have the same versions of the Arduino IDE and libraries, no difference to be found. Finally, on the first computer, we completely removed Arduino (no ordinary uninstall, which apparently leaves remnants in -hidden- folders anyway), installed it freshly and all problems are gone. What the problem was... we still have no idea and we won't find out anymore. I learned that the Arduino IDE can be very unpredictable, even if it was the first time we encountered such a thing. And let's agree: also the only and last time!
With minor modifications to the software, this project can be used with any ESP32 or -8266 module, but for this project we have chosen the M5Stack ESP32 Basic Core module which is available in the Elektor shop. It is a nice compact module in a neat housing with a graphical display, push buttons, a speaker and a built-in rechargeable battery. I/O's are accessible via connectors on the outside, but if you open the back of the box and remove a plug-in board, you'll find a 30-pole expansion connector to which you can connect your self-designed hardware.
For small expansions like this one, the extra hardware fits on a PCB of the same size as the M5Stack module itself. With an extra part for the housing, for which designs for 3D printing can be found on the internet, you have a neatly finished device without a lot of extra work, so that an experimental prototype is quickly translated into a box that also looks good in the living room. In short: this M5Stack is very suitable as a basis for ESP32 designs, both as a development platform for a project as a 'ready-made' device. In principle, you can also use the M5Stack and our expansion board to build a complete doorbell installation.
The built-in loudspeaker can compete with a 'real' doorbell in terms of volume and a separate doorbell button can be placed parallel to (or instead of) the output transistor of the optocoupler. In the Arduino-sketch the ringing signal has to be added, and the logical level at GPIO17 is -if the button is connected like this- inverted. However, this will not be discussed here, we will limit ourselves to a doorbell extension that is connected to an existing installation. Hardware Figure 1 shows the schematic diagram for the doorbell, it couldn't be simpler.
We assume that the M5Stack is externally powered via USB, the additional hardware therefore only provides the control of a door opener via T1 and RE1 and connection to the doorbell button via optocoupler IC1. Our doorbell extension can therefore be connected directly to an existing doorbell system, so the two wires of the doorbell button are connected to K1 of our circuit. Traditionally, an electric doorbell is supplied with an AC voltage, but the bell voltage has never been a standard. Depending on the installation, this can be a voltage between 6V and 24V and there will probably also be exotics that are outside this range. We have this alternating voltage on the wires of the button as long as it is not pressed and, in this case, also on K1. The optocoupler translates the presence of this voltage into a logical level at GPIO17 of the ESP32: the level at rest (when not ringing) is low and high when the button is pressed.
Then there is the BT1 connection which, as the indication suggests, is intended to optionally (re)connect the 3.7V lithium battery that is fitted as standard in the M5Stack. Note the polarity, the red wire at the plus and black at the minus of BT1.
The expansion board contains only through-hole components and will therefore not be so difficult to assemble. We do pay special attention to the mounting of K2, because this is mounted differently than we are used to with such a standard part (see picture). Normally the short sides of the pins are inserted into the PCB from the component side and soldered, but in this case we do it the other way around: the long pins are inserted from the copper side ('bottom' of the PCB) upwards and soldered on the component side. The short pins are inserted into the socket of the M5Stack and the plastic of K2 also serves as a spacer between the two circuit boards.
Telegram Installation
The next step is to create an account on Telegram on a mobile phone, which starts by downloading the Telegram app from the App Store or Google Play. Installing that app is not difficult, the account is linked to the phone number of the device. Once that's done, it's best to install the corresponding Telegram app on your PC or Mac as well, which makes a difference when the connection between Telegram and the ESP32-sketch is made.Log in to Telegram app on the computer with the mobile phone number, in the app on the phone a verification code will appear that needs to be typed back into the computer, after which Telegram will be active there. The sketch on the ESP32 will work with a so-called 'bot', which is easy to imagine as a kind of automatic answering machine. It can respond to commands received via a Telegram chat message (as in this project: controlling a door opener), or send messages via Telegram that are triggered by events in or near the ESP, such as reporting a key press or sending an ADC value. This bot must first be created in Telegram and this is done by searching for 'BotFather' in the contacts list. BotFather itself is a bot, that helps to create our doorbell bot in a chat dialogue.
After entering the command '/newbot' the dialog starts, asking for a name (which will later be displayed in the contact list in Telegram) and for username of the bot, the latter should always end with the characters 'bot'. Note the slash ('/') at the beginning of each bot command. When this process is successful, the BotFather will notify you and display a code ('token') needed to authorize the new bot to send requests to the Bot API. Keep this token in a safe place, as it can be used by anyone to control the doorbell bot, which is why we have made the token of our bot in Figure XX (using_BotFather.jpg) unreadable. In this dialog with BotFather, click on the framed link ('t.me/...') to open a chat window for the new bot, which will also be added to the contact list. This bot is now ready for use, although it still needs to be linked to the Arduino-sketch for our doorbell extender.
Arduino sketch for this project In the software download of this project you can find the sketch DOORBELL.INO, the source code for the ESP32 firmware. This sketch can be improved and in its current form is mainly intended to show how Arduino/ESP32 and Telegram can work together to make control systems very simple. Especially the operation of an electric door opener is a vulnerability, people could hack into the bot and open the door with their phone or computer. Elektor accepts no liability whatsoever for any damage that may result from the application of this project! In the sketch, our M5Stack must be registered on the local wireless WiFi network and given access to the Telegram-bot that we have just created.
The credentials of your WiFi network are entered in lines 17 and 18, the token that the BotFather has reported must be entered in line 21. Hence the earlier advice to create the bot on the computer, so that the token can easily be copied into the sketch, it is not exactly a set of characters that you can easily remember and retype. Once the installation of the Arduino IDE as mentioned above has been followed and successfully completed, the sketch will compile without any problems. In the Tools menu -when the M5Stack is connected to a USB port of the computer- the correct board ('M5Stack-Core-ESP32') and the virtual COM port must be set to upload the sketch to the ESP32. After that is done, the sketch will start up, connect to the network and the name of the WiFi network and the IP address of the doorbell extender will appear on the LCD of the M5Stack.
The bot must be activated after each restart of the sketch by sending the command '/start' via the chat window in Telegram, the bot must then give a feedback including an overview of the commands it supports. The operation is also very simple. When the doorbell rings, a message is sent via the Telegram app to your computer or smartphone. The user can respond by opening the door himself or by using the '/Open' button to operate an electric door opener (if there is one), the '/Ignore' button waives this option, and the '/Status' button (which checks the connection to the doorbell extender) appears again at the bottom of the chat screen. These commands can also be simply typed in and sent via the chat window, please note that they are case-sensitive!
The UniversalTelegram bot library actually does most of the work in this project. This library and its documentation can be found at https://Github.com/witnessmenow/Universal-Arduino-Telegram-Bot, and with the examples that come with it, it doesn't take a lot of effort to get started. Our doorbell-sketch is based on the 'custom keyboard' example, which shows how to send control buttons to the Telegram app, which is a very handy option, so you don't have to type control commands yourself in the chat window.
The most important subroutine is 'handleNewMessages' which processes incoming messages. In four If-statements the commands/messages our bot understands are handled: start, status, Ignore and Open. For sending messages the sketch needs the ID of the chat, which is saved in variable 'ThisChat' after receiving the first command '/start'. The push-button (doorbell) is captured in an interrupt, note the IRAM_ATTR attribute that is required for the declaration of an ESP interrupt service routine for correct handling.
Diskussion (0 Kommentare)