
ARM T-Board [150059]
In 2014 Elektor presented three AVR T-Boads designed by Andrew Retallack, tiny processor boards designed to be fitted on bread board for building and testing new prototypes. These were followed by the T-board Wireless and Audio T-board and now we proudly present this ARM T-Board!
In 2014 Elektor presented three AVR T-Boads designed by Andrew Retallack, tiny processor boards designed to be fitted on bread board for building and testing new prototypes. These were followed by the T-board Wireless and Audio T-board and now we proudly present this ARM T-Board!
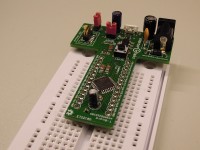
This T-board contains an Atmel ATSAMD21E18 microcontroller, with all its I/O-pins and supply voltage routed to two 14-pin SIL-connectors that exactly fit on a standard bread board. The USB-pins are also connected to a type B micro-USB connector, which can also be used to power the microcontroller via an onboard 3.3V voltage regulator. Alternatively the supply voltage can be connected to 2.1mm center pin power jack K1. Last but not least an external 3.3V supply voltage can be linked to pin 1 of jumper JP1 or pin 13 and 14 of K2 (i.e. supply voltage from the bread board).
The ARM processor can be programmed via K4, a miniature 10-pin connector like the one used on an AT-ICE programming interface with the SWD programming protocol. Please note that this is exactly the same connector as the one used on the Atmel JTAG interface, but the pinning is not compatible! The USB interface also contains the USB-ID-Pin, used to identify the USB host in USB-OTG applications, JP4 is used to connect the processor pin to the USB-pin if necessary. S1 serves as reset button when JP3 is closed, or an optional external reset signal can be connected to pin 1 of JP3.
Bootloader
Things are better with bootloaders, and since this is especially true for microcontroller development boards we decided to program one into our SAMD T-Board 150059. Here is how you use it.
The bootloader in question is provided by Atmel and is described in application note AT07175. Our microcontroller is the SAMD21E18A and to program it through the bootloader you must download and install Atmel’s free utility SAM Boot Assistance better known as SAM-BA.
Connect the SAMD T-Board to the PC with a USB cable and launch SAM-BA. If all is well it will find the board on a COM port (if not, wait until your operating system finishes installing the driver for the board), select it. From the board drop-down list choose the "samd21_xplained_pro".
For some reason SAM-BA 2.16 is different and you cannot use the board "samd21_xplained_pro". Below is a file "samba-2.16-add-to-tcl_lib-folder.zip" that can fix this problem. In the archive is a folder and a file and both are supposed to be copied into the folder [...]\sam-ba_2.16\tcl_lib. In this folder there is already a file "boards.tcl" that can be replaced by the file in our archive (unless you have modified it). Now when you start sam-ba you will have a board called "Elektor-samd21e18-T-board" that should work as with previous versions of sam-ba.
Leave other settings at their default value and click the “Connect” button.

Important: if your SAMD T-Board is virgin, the bootloader will run automatically. If a user application is already present, pull pin A15 low before connecting the board to the PC or before resetting it.
After SAM-BA has opened its main window you must first set the important parameter “Address” on the “Flash” tab to 0x2000. Unfortunately SAM-BA will not memorize this value so you will have to set it every time. Now in the “Send File Name” box browse to the executable file (.BIN) that you want to program into the MCU. When found click “Send File”.

As long as you don’t launch your application you can play around with SAM-BA. Have a look at the proposed Scripts, for instance, or read back the MCU’s memory. However, as soon as you leave the bootloader the only way to get in again is to close SAM-BA, keep pin A15 pulled low while resetting the board (or while reconnecting it) and restart SAM-BA. This is a bit tedious, but that is what SAM-BA is. It is only an assistant.
Make your project bootloader compatible
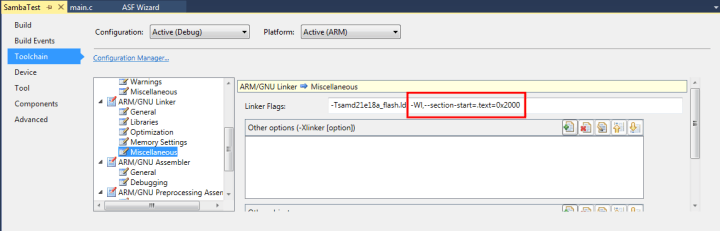
The ATSAMD21E18 does not have special bootloader memory and so the bootloader occupies a part of the application flash memory. In order for your program to be bootloader compatible you must add an option to the project's linker settings. Supposing that you are using Atmel Studio you must open the Linker's miscellaneous settings (Project properties -> Toolchain -> ARM/GNU Linker -> Miscellaneous) and then add “-Wl,--section-start=.text=0x2000” to the “Linker Flags”.
If you compile your program it will now be loaded at address 0x2000 instead of 0x0000 and not only not overwrite the bootloader (BTW, SAM-BA won't let you do that), it will also work as if it was running from 0x0000.
This T-board contains an Atmel ATSAMD21E18 microcontroller, with all its I/O-pins and supply voltage routed to two 14-pin SIL-connectors that exactly fit on a standard bread board. The USB-pins are also connected to a type B micro-USB connector, which can also be used to power the microcontroller via an onboard 3.3V voltage regulator. Alternatively the supply voltage can be connected to 2.1mm center pin power jack K1. Last but not least an external 3.3V supply voltage can be linked to pin 1 of jumper JP1 or pin 13 and 14 of K2 (i.e. supply voltage from the bread board).
The ARM processor can be programmed via K4, a miniature 10-pin connector like the one used on an AT-ICE programming interface with the SWD programming protocol. Please note that this is exactly the same connector as the one used on the Atmel JTAG interface, but the pinning is not compatible! The USB interface also contains the USB-ID-Pin, used to identify the USB host in USB-OTG applications, JP4 is used to connect the processor pin to the USB-pin if necessary. S1 serves as reset button when JP3 is closed, or an optional external reset signal can be connected to pin 1 of JP3.
Bootloader
Things are better with bootloaders, and since this is especially true for microcontroller development boards we decided to program one into our SAMD T-Board 150059. Here is how you use it.
The bootloader in question is provided by Atmel and is described in application note AT07175. Our microcontroller is the SAMD21E18A and to program it through the bootloader you must download and install Atmel’s free utility SAM Boot Assistance better known as SAM-BA.
Connect the SAMD T-Board to the PC with a USB cable and launch SAM-BA. If all is well it will find the board on a COM port (if not, wait until your operating system finishes installing the driver for the board), select it. From the board drop-down list choose the "samd21_xplained_pro".
For some reason SAM-BA 2.16 is different and you cannot use the board "samd21_xplained_pro". Below is a file "samba-2.16-add-to-tcl_lib-folder.zip" that can fix this problem. In the archive is a folder and a file and both are supposed to be copied into the folder [...]\sam-ba_2.16\tcl_lib. In this folder there is already a file "boards.tcl" that can be replaced by the file in our archive (unless you have modified it). Now when you start sam-ba you will have a board called "Elektor-samd21e18-T-board" that should work as with previous versions of sam-ba.
Leave other settings at their default value and click the “Connect” button.
Important: if your SAMD T-Board is virgin, the bootloader will run automatically. If a user application is already present, pull pin A15 low before connecting the board to the PC or before resetting it.
After SAM-BA has opened its main window you must first set the important parameter “Address” on the “Flash” tab to 0x2000. Unfortunately SAM-BA will not memorize this value so you will have to set it every time. Now in the “Send File Name” box browse to the executable file (.BIN) that you want to program into the MCU. When found click “Send File”.
As long as you don’t launch your application you can play around with SAM-BA. Have a look at the proposed Scripts, for instance, or read back the MCU’s memory. However, as soon as you leave the bootloader the only way to get in again is to close SAM-BA, keep pin A15 pulled low while resetting the board (or while reconnecting it) and restart SAM-BA. This is a bit tedious, but that is what SAM-BA is. It is only an assistant.
Make your project bootloader compatible
The ATSAMD21E18 does not have special bootloader memory and so the bootloader occupies a part of the application flash memory. In order for your program to be bootloader compatible you must add an option to the project's linker settings. Supposing that you are using Atmel Studio you must open the Linker's miscellaneous settings (Project properties -> Toolchain -> ARM/GNU Linker -> Miscellaneous) and then add “-Wl,--section-start=.text=0x2000” to the “Linker Flags”.
If you compile your program it will now be loaded at address 0x2000 instead of 0x0000 and not only not overwrite the bootloader (BTW, SAM-BA won't let you do that), it will also work as if it was running from 0x0000.
Want to build a project?
Bring your design to life with the Elektor PCB Service, powered by Eurocircuits. Upload the project files and order professionally manufactured PCBs or assembled boards through a proven European production platform.
Supporting KiCad, Eagle, Gerber, and ODB++ formats, the service is suitable for everything from prototypes and validation builds to series production and volume manufacturing.
Made in Europe. Fast. Reliable. Professional.
Diskussion (1 Kommentar)