
Prototype board for microcontroller with LCD
Save time if you build a prototype with microcontroller and LCD. Because at least a part of such a circuit is the same you can often use the same PCB.
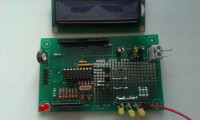
Because I wanted to build a timer with a microcontroller and an LCD-display and because this was the third project in a couple of months with the same basic components, I decided to create a prototype board for this purpose.
On the PCB all components which are basically needed can be mounted and there is a prototyping area for the rest of the circuit.
On the PCB all components which are basically needed can be mounted and there is a prototyping area for the rest of the circuit.
- - Most 18 pins PIC16 microcontrollers can be used; I normally use the PIC16F628a.
- - LCD's to be used are based on HD44780 or equivalent and have a 16 pin SIL-connector.
- - There is a small power-suply because the designs have to be operated on 9 or 12 V. Only a few mA are available for the circuit on the prototyping area. Otherwise cooling of the 78L05 or a larger stabiliser is needed. This is also the case with a larger input voltage.
- - On X1 a LED and 6 switches can be connected (to port B), X2 is connected to the prototyping area.
- - All 8 pins of port A have resistors to ground (RN1 and RN2). Eventually these resistors can be omitted if not needed.
- - You can mount a crystal with 2 capacitors if needed.
- - There is an ICSP-connector to program the microcontroller in circuit. I later realised that a jumper to switch the Vdd of the microcontroller between the ICSP-connector and power supply might be needed.
Updates vom Autor